Explore How to make a family tree in MS PowerPoint
How to make a family tree in MS PowerPoint
Whether you're a genealogy enthusiast or simply want to preserve and share your family history, MS PowerPoint offers a user-friendly platform to design and customise your family tree. Learn how to leverage the tools and features in PowerPoint to create a visually appealing and informative representation of your family.
Creating a family tree is a great way to organise and display your family history. While there are many tools available to help you create a family tree, MS PowerPoint is a versatile and accessible option that can help you create a polished and professional-looking family tree. With its intuitive interface and powerful design tools, PowerPoint allows you to customise every aspect of your family tree, from the layout and design to the images and text. In this article, we'll take you through the steps to create a family tree for MS PowerPoint, so you can share your family history with pride.
Pedigree Chart vs Standard Tree
When we showed you how to make a family tree in Google Docs, we built what is called a pedigree chart. This kind of tree only shows your pedigree, in other words, your direct ancestry. One of the key benefits of a pedigree chart is that it lets you display your ancestry as far as it can go (or as far as you know it). However, its key weakness is that it doesn’t allow you to show much else, including all of the other people that make up your family, like your siblings, aunts, uncles and cousins.
On the other hand, a standard tree does just that - it allows you to visualise your immediate and extended family, up to a certain point. You can see the differences below.
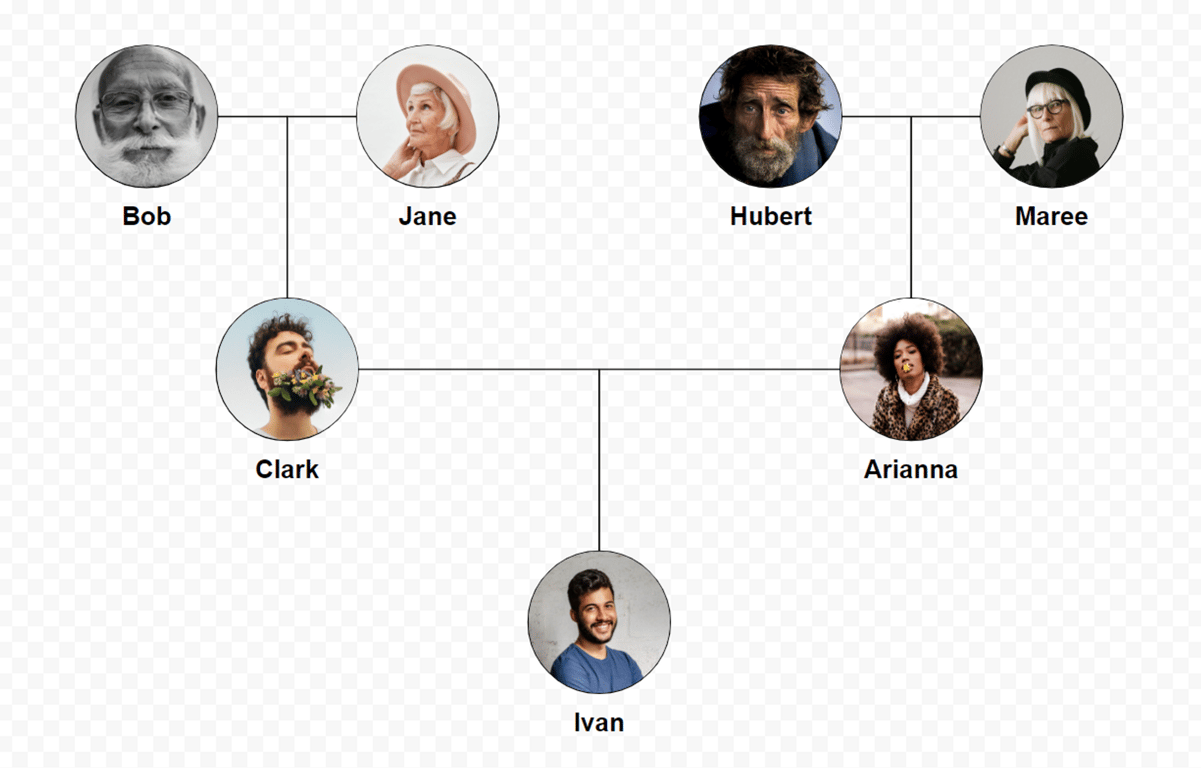
Pedigree Chart
Standard Tree
This article will walk you through how to make a great looking Standard Tree in Powerpoint.
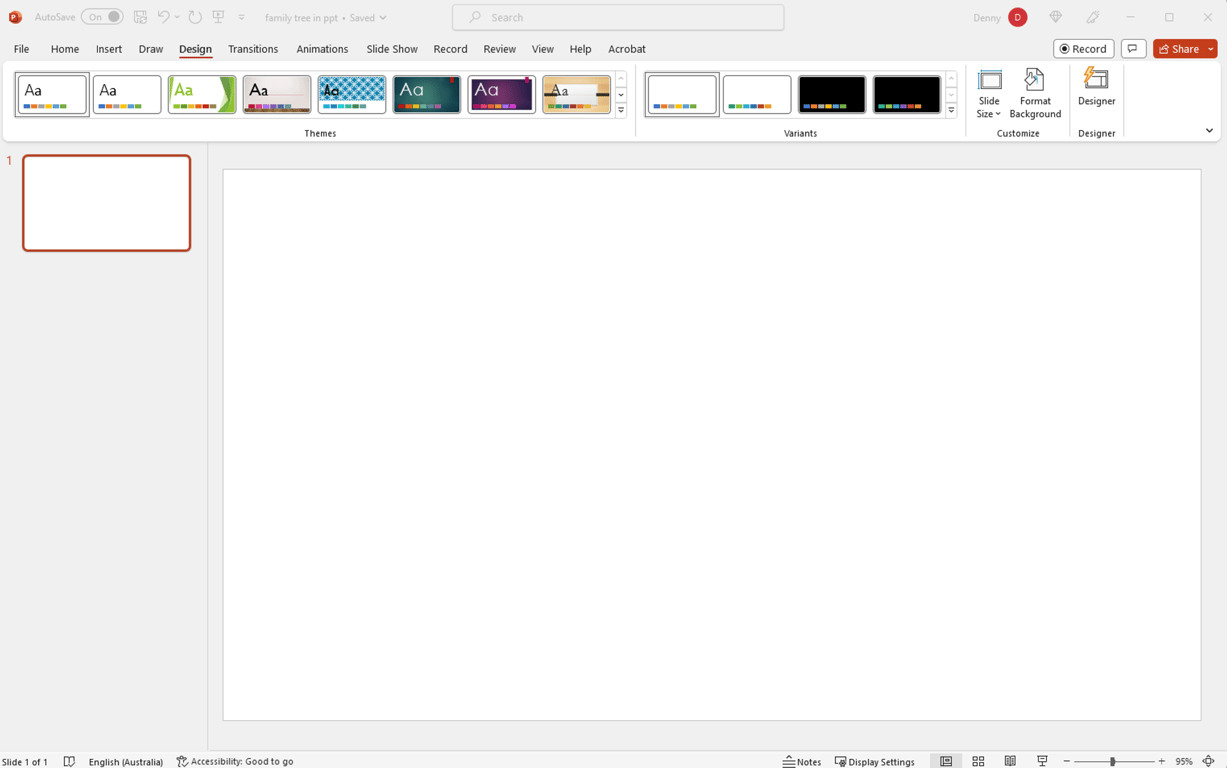
Step 1: Get PowerPoint set up
Open up PowerPoint to a new blank slide. I’d recommend making sure your slide is set up as widescreen (to change it go to the toolbar and click Design > Slide Size > Widescreen (16:9). Get rid of any text boxes that were there when you opened up PowerPoint and you should have something like this. If you do, you’re good to go.
Step 2: Create a template for an individual
This is where we’re going to branch away from how most other people would make a family tree in PowerPoint. Common advice is to use the inbuilt SmartArt graphics to create your tree. Sure, you’ll knock it out really quickly, but you’ll never want to look at it again. These steps will take you longer, but at the end you’ll have a family tree that you actually want to show to your family (plus, you might pick up some useful PowerPoint skills along the way).
To set yourself up for success, think first about how big you want your tree to be, or how many people will be on it. Then let’s get started creating a template for an individual. To keep things simple, we’re just going to use a placeholder for an image (I prefer circular) and a space for their name, but if you want to add other details like age or date of birth, feel free.
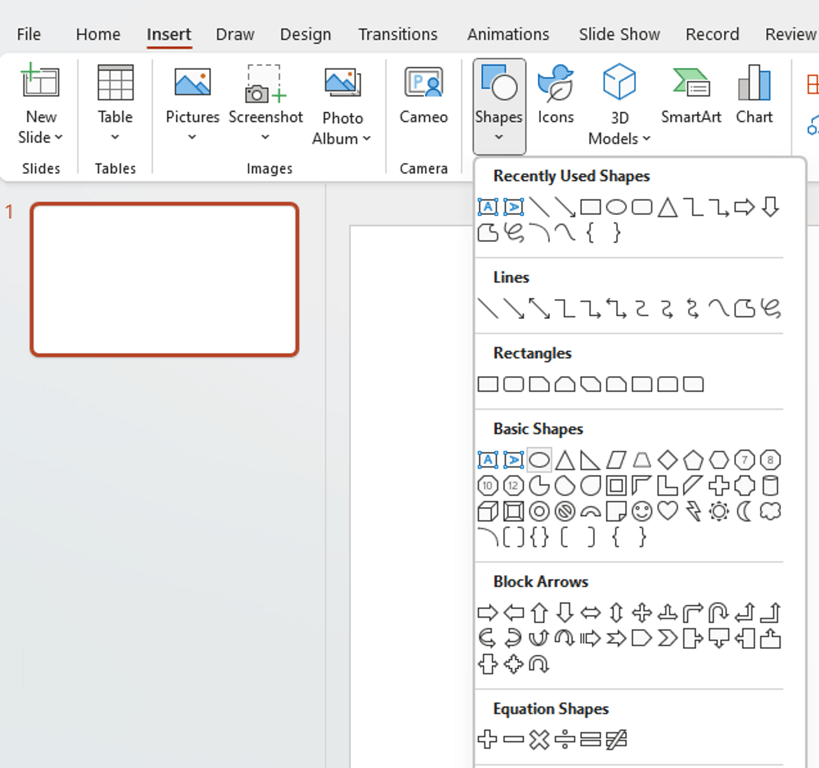
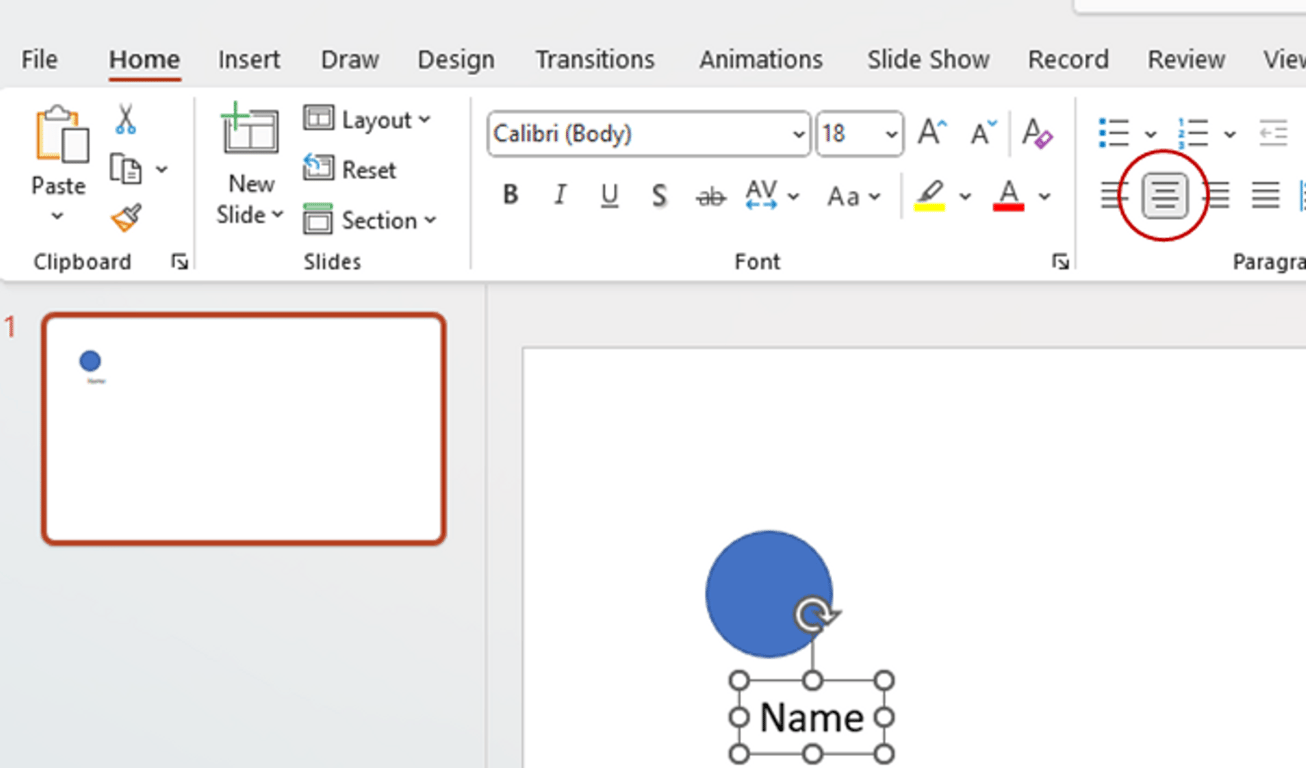
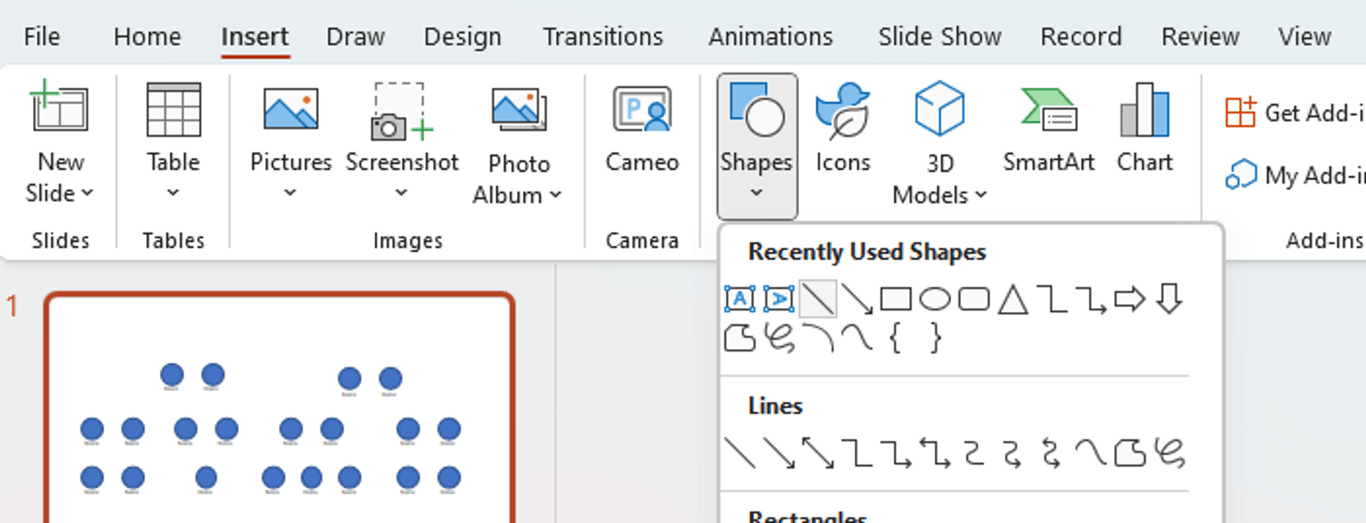
To draw the circle, go to Insert > Shapes and select the circle. To draw a perfect circle and not an oval, just hold the Shift key as your drag your mouse across the screen. Then go to Insert > Text Box and click somewhere underneath the circle to add your text box. For now we’ll just write “Name” as a placeholder.
For the circle, it might be worth changing the border colour or removing it entirely right now. It’s not a big problem if you don’t change it now, but you’ll see why in Step 6. To do so just click on the circle and hit Home > Shape Outline > No Outline.
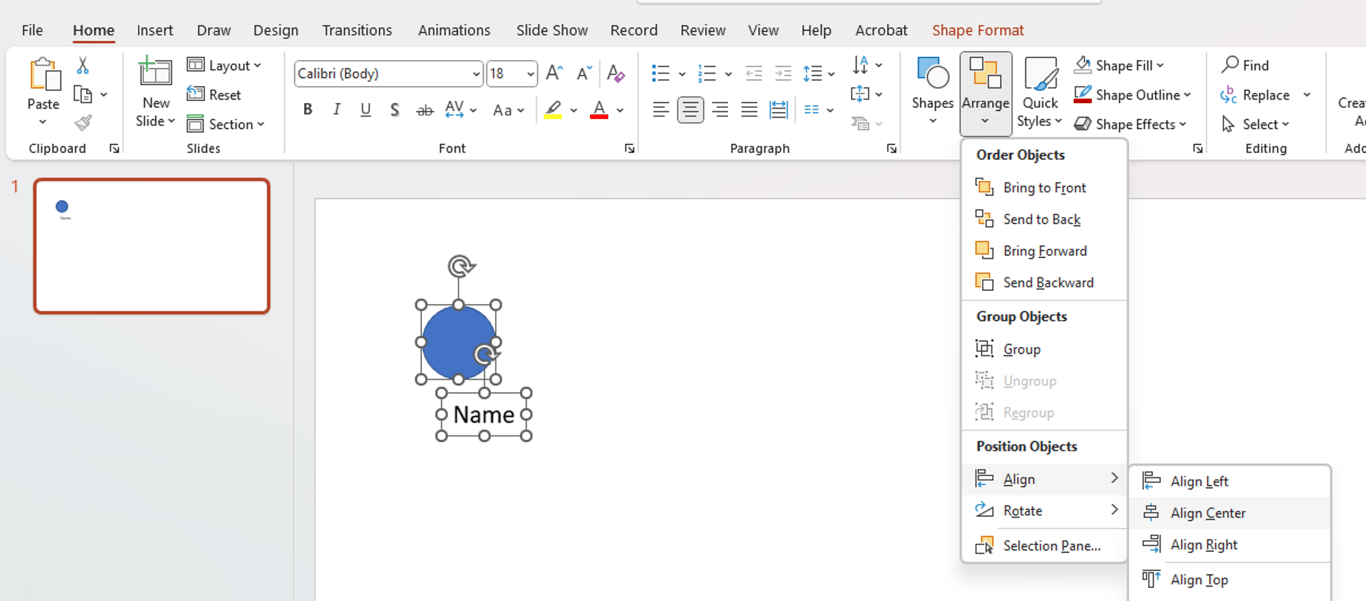
Then, we just need to align them and get the sizing right. Click on the text box and hit Home > Center to center the text in the box, then to get them aligned just select both items by holding Ctrl as you click them and hit Home > Arrange > Align Center.
Now that you’ve got a a template for an individual, we’ll think about the sizing. This can be a bit of trial and error, but you should think about where your tree will be widest and make sure you can fit at least that many people, and probably more because you’ll want to space them out. I’d also lean towards making the individual smaller than you’d think. You might also need to play around with font sizing for the text to get it to look nice under the image.
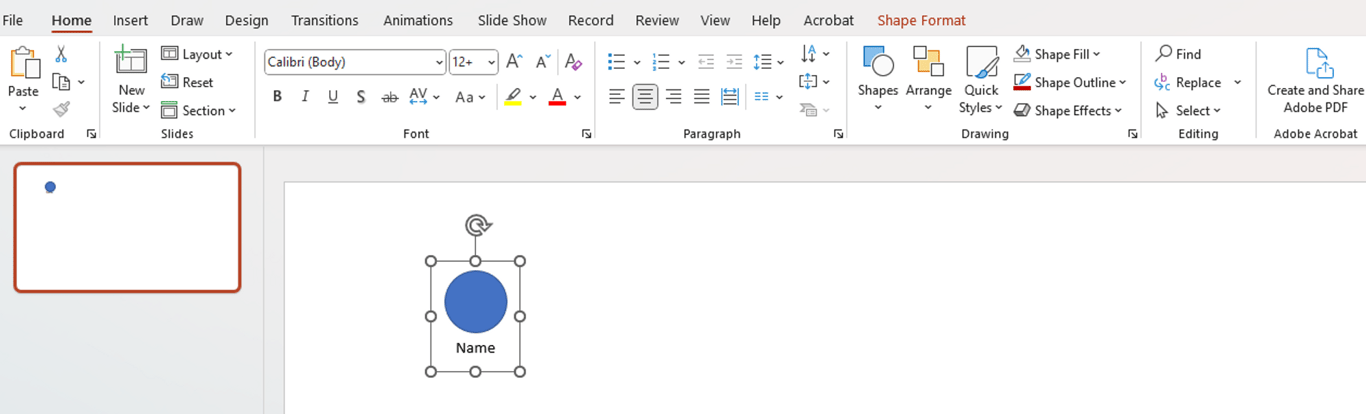
Once you’re happy with the sizing and positioning of the text box relative to the picture, group the elements together so that it’s easier to move around and work with. To do so, select them both, right click on either and click Group. You should have something resembling this.
Step 3: Start positioning people on your tree
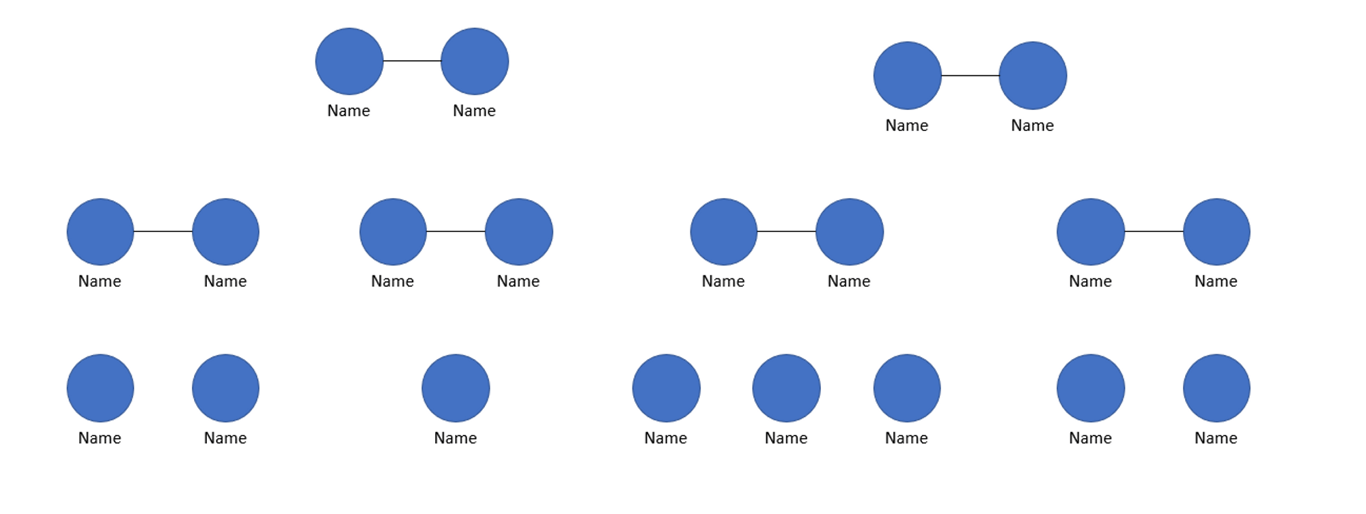
Time to start positioning people on screen roughly where you think they will end up. This way you will also get a good sense for whether you seriously misjudged sizing, or you were close enough.
For my tree, I’ll be including my siblings, my parents, my parents’ siblings, my cousins, and my grandparents. To quickly start moving people around, just hold Ctrl while you click on the person template and drag it to somewhere else on screen. Don’t let go of Ctrl until you release your mouse, and there should be another copy of it. Keep doing this until you’ve very roughly placed everyone on your tree, and if you run out of space, it means your template is probably too big.
As a general rule and for a simple tree, men will go on the left and women on the right, but of course do whatever suits your family best.
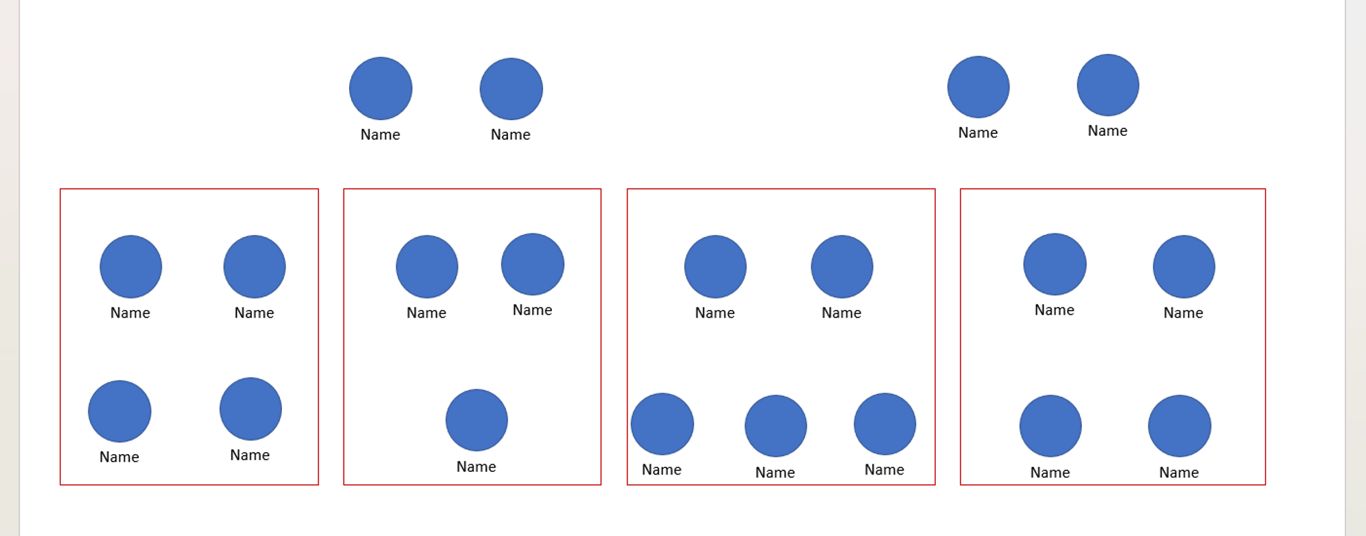
It won’t look like much at this stage, but remember you’re doing this for your family, so it just needs to make sense to you. My version is below - I’ve put some boxes around each of the different family units just to take it more clear for you.
I’m in the bottom layer, and includes me and two siblings, four cousins, my dad with two siblings and their partners, and my mum with one sibling and their partner, and then my grandparents on each side. Notice how quickly I used up the space, so if your family is much larger, you’ll need to make your people smaller.
Step 4: Finalise positioning
It’s time to tidy up what we’ve made so far. You can get really pedantic about things like spacing, but you end up spending a whole lot more time for not that much benefit. We’re going to eyeball most of the spacing and use PowerPoint’s inbuilt tools to make sure we get alignment right.
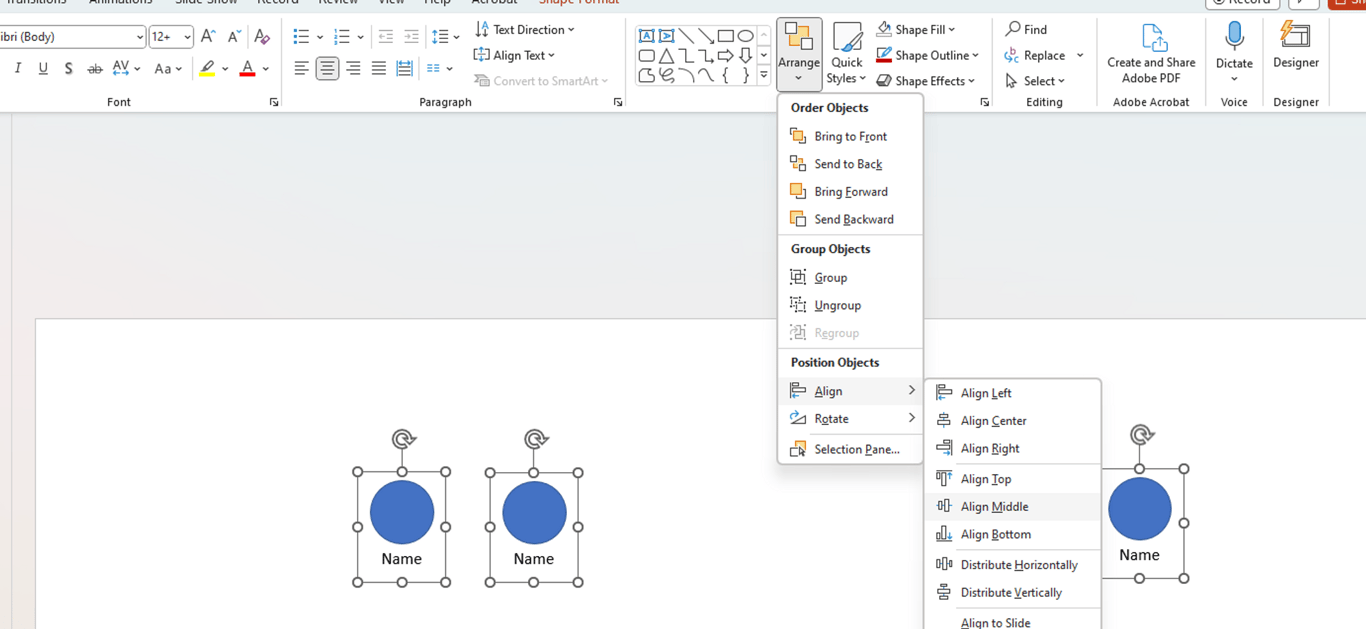
First off, let’s align each horizontal layer. To do that, select each person in that layer by clicking and dragging your cursor over them to select multiple items, or holding Ctrl and clicking on them one by one. Then like we did before, from the toolbar go to Arrange > Align > Align Middle. Do that for each individual row.
Then we’ll get to each family unit. You can use the same principles of alignment to get the positioning really precise. For example, if you have two parents and two children, you can align each child to sit exactly below each parent. Or if you have two parents and one child, and you want that child exactly in the centre, you can do select all three people then hit Arrange > Align > Distribute Horizontally.
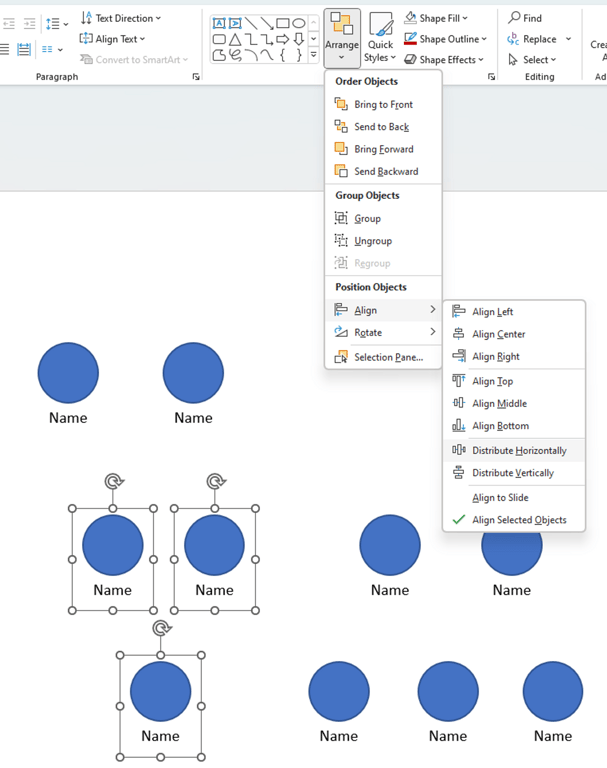
What if you have three children that you want evenly spaced out and then perfectly centered below their two parents? Well, we’ve covered all the tools you need, it’s just a case of using them differently. So for example, in this case, you can Distribute Horizontally (the children) like we just did, Group them together, Group the parents together, then for both of those groups, Align Center.
Play around with these tools. They can be really useful, even outside of family tree making.
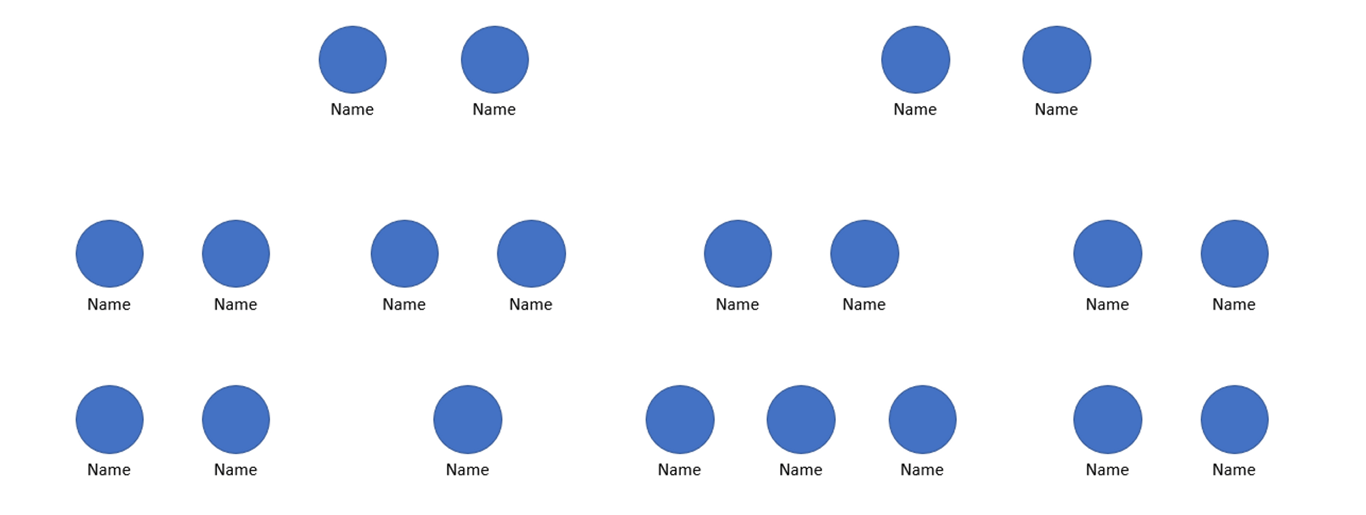
After a couple of minutes of aligning, distributing and reorganising, my tree now looks like this, and I think it’s coming together pretty nicely.
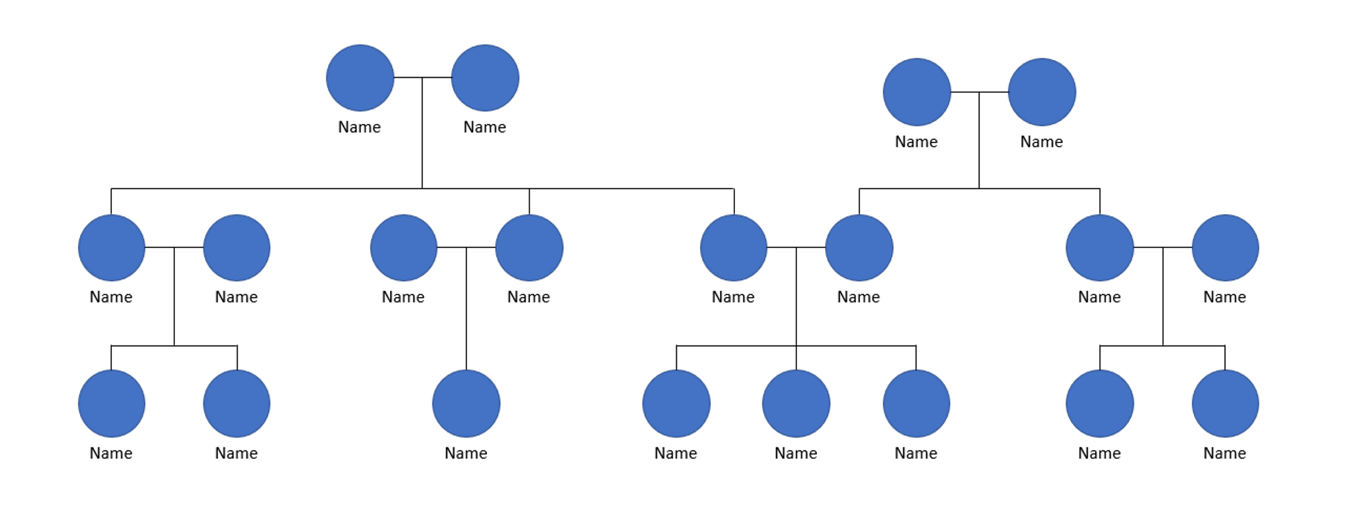
One more step that will get it looking really polished is to make sure the spacing between layers is also equal. You can do that by grouping each horizontal layer, then distributing those new layers vertically (Arrange > Align > Distribute Vertically). If you have existing groupings that prevent you from selecting individuals in each layer, you can ungroup them by right clicking on that group and selecting Ungroup. Distributing vertically will probably only make a small change, but I think it’s worth it for the short amount of time it takes.
Step 5: Add lines
Getting the lines in can be one of the more fiddly parts of the process, because we’re building a custom tree and not relying on any pre-existing SmartArt or templates. It may take some time, but the results will be worth it.
We’ll start with lines between each partner pair. Go to Insert > Shapes, select the straight line then connect it between two partners. I like using black lines so to change the colour, make sure the line is selected and go to Shape Format > Shape Outline, and select a colour of your choice. You can also play around with the thickness under Shape Outline > Weight. I’ve used a weight of 1pt.
Rather than creating a new line and changing its colour each time, just reuse the first one by copying and pasting it as many times as required.
After adding in all the partner lines, my tree is looking something like this.
From here you can reuse the horizontal lines again to create the horizontal lines that sit above the children. Just stretch them out as required. Holding Shift as you drag it out will ensure the line stays horizontal.
Now I’ve got something like this. Don’t forget about vertical alignment to make sure the lines at each level match up.
Finally, we’ll add in all the vertical lines. You can draw a new line vertically while holding Shift to ensure it is actually vertical. That might be easier because it won’t have anything to connect to like for the horizontal lines and we’ll be using a bit more guess work here. It will help to zoom in as you do this to get them into position properly and get the line joins to look seamless. You will also need different length lines, as you can see in my example below.
Now my vertical lines are in and this is really shaping up nicely. At this point you might realise that you want to increase or decrease some of the horizontal or vertical spacing.
Step 6: Add pictures and other details
There are a few steps in adding pictures to the family tree we’ve created so far. You don’t have to go through all these steps if you’re not using circular images, but this is the look I prefer.
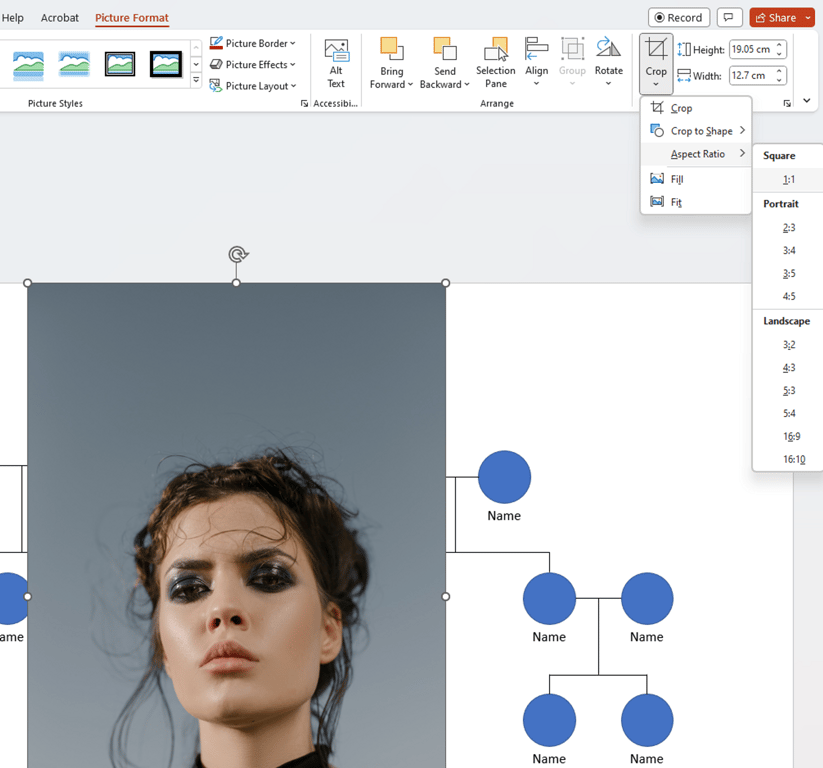
First, upload your image into the PowerPoint. There are a number of ways to do this, but I’ve got the files saved on my computer, so I just drag it straight from my file explorer into PowerPoint.
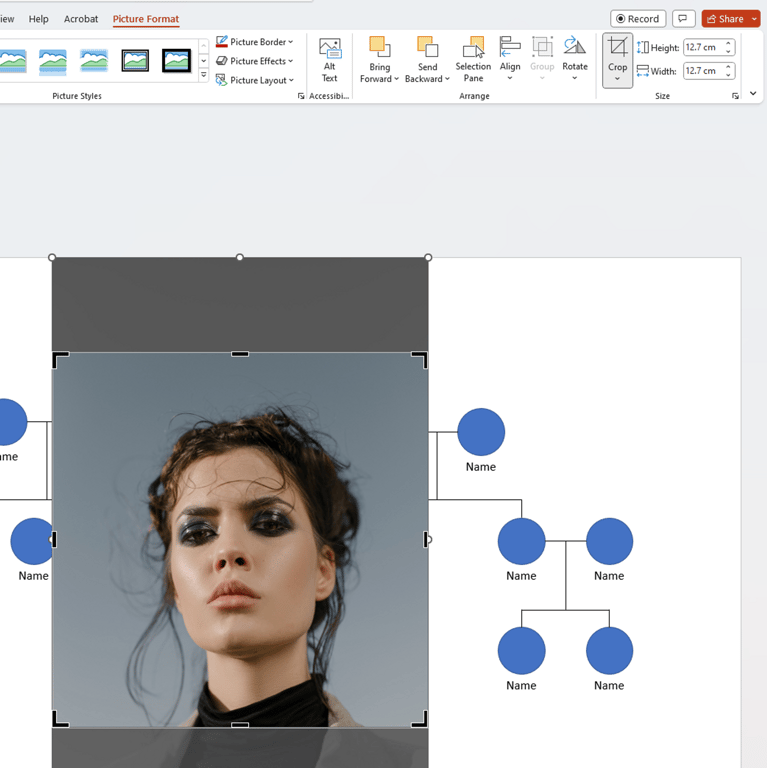
The image will appear somewhere on screen and now there are two things I need to do. First is to crop it to a square shape. I’ll do this by selecting the image, going to the toolbar and clicking Picture Format > Crop > Aspect Ratio > 1:1 , and then repositioning the image within the dotted black lines. You can also drag the corners in to zoom in on the face. Just hold Shift so that you maintain the aspect ratio.
Just click somewhere else on screen it and you’ll be left with a cropped image.
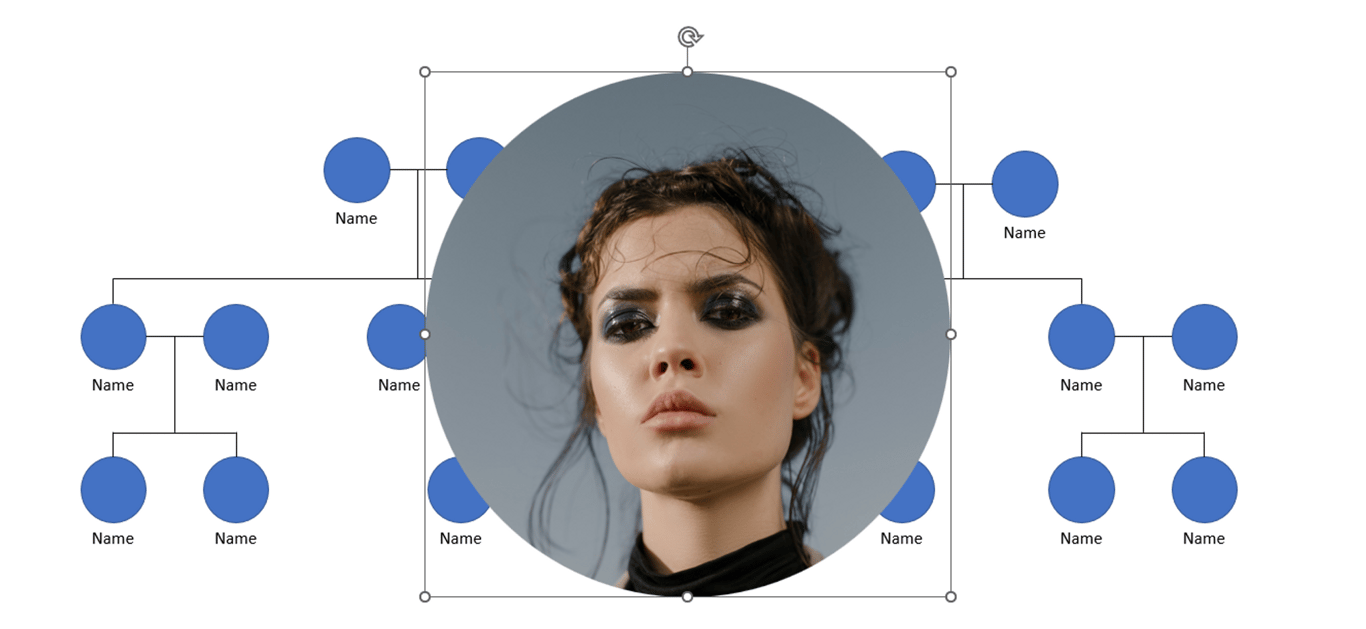
The next thing is to crop that square image to a circle. The reason we cropped it to a square first is that if we didn’t we’d end up with an oval, instead of a circle. So to crop it to a circle, simply click on the image, go to the toolbar again but this time click Picture Format > Crop > Crop to Shape and select the circle.
Now we’ve got a perfectly circular image. We just need to resize the cropped image so that it fits our template.
To do that, click on any of the circles on screen (you’ll probably need to click a few times until it’s selected because of the groupings, or you can ungroup them), then go to the toolbar and click Shape Format again. On the right hand side you should be able to see it’s height and width dimensions.
My circles have a height and width of 1.58cm, so all I need to do is click on my recently cropped image, change it’s dimensions to match, and drag it into place.
A quick note - you can see a thin blue border around the image because of the circle we’re placing it over. You can change that by first removing the circle’s border or changing it’s colour. To do that, select the circle, then from the toolbar click Home (or Shape Format) > Shape Outline > No Outline (or any colour of your choosing). If you want to go down this path, it would be a good idea to do this in bulk now. Alternatively, you can also delete the placeholder circle before or after you drag the image into place.
To delete it afterwards, right click on the new image that you just dragged over it, and hit Send to back. Then you can simply click on the circle that was behind it and delete it.
When it comes to adding in names, if the name is too long and wraps in the box, you can either make the font smaller or just stretch the box out by clicking on it (hold Ctrl while you click on it so that you actually click on it, not in it), then hold Shift and press the right arrow key on your keyboard until the box is wide enough. This way it stretches from the centre and you don’t need to reposition it.
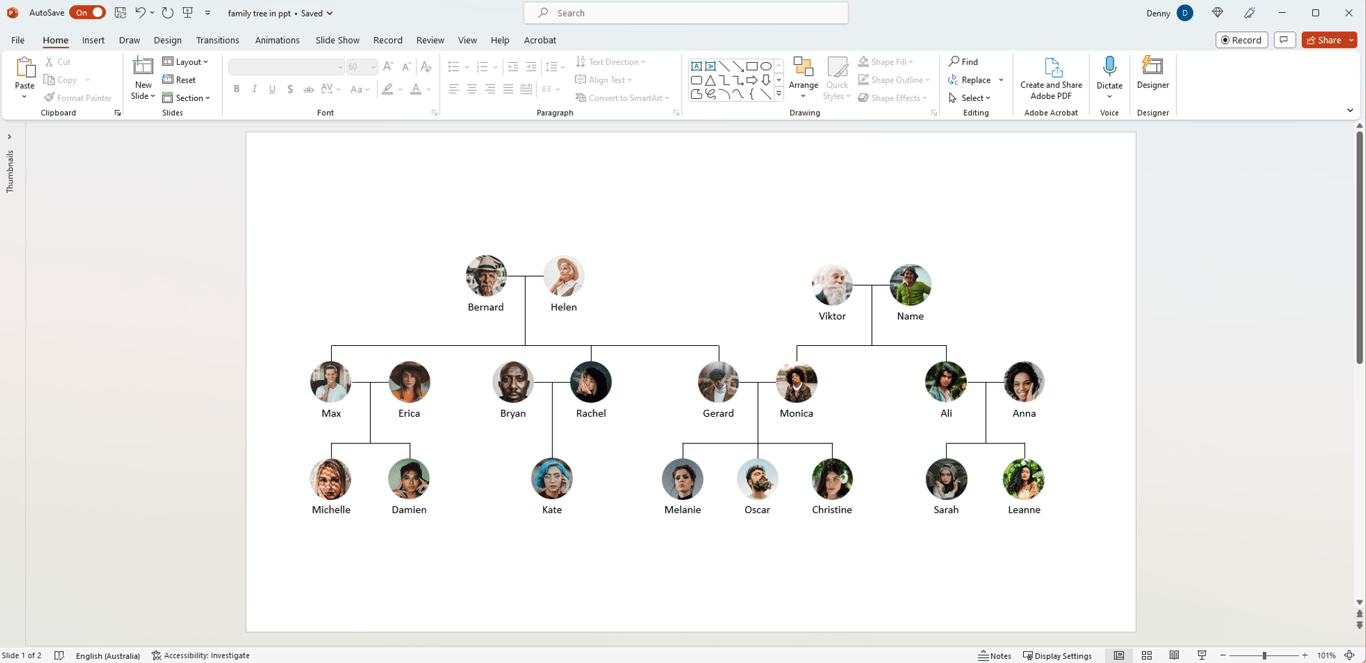
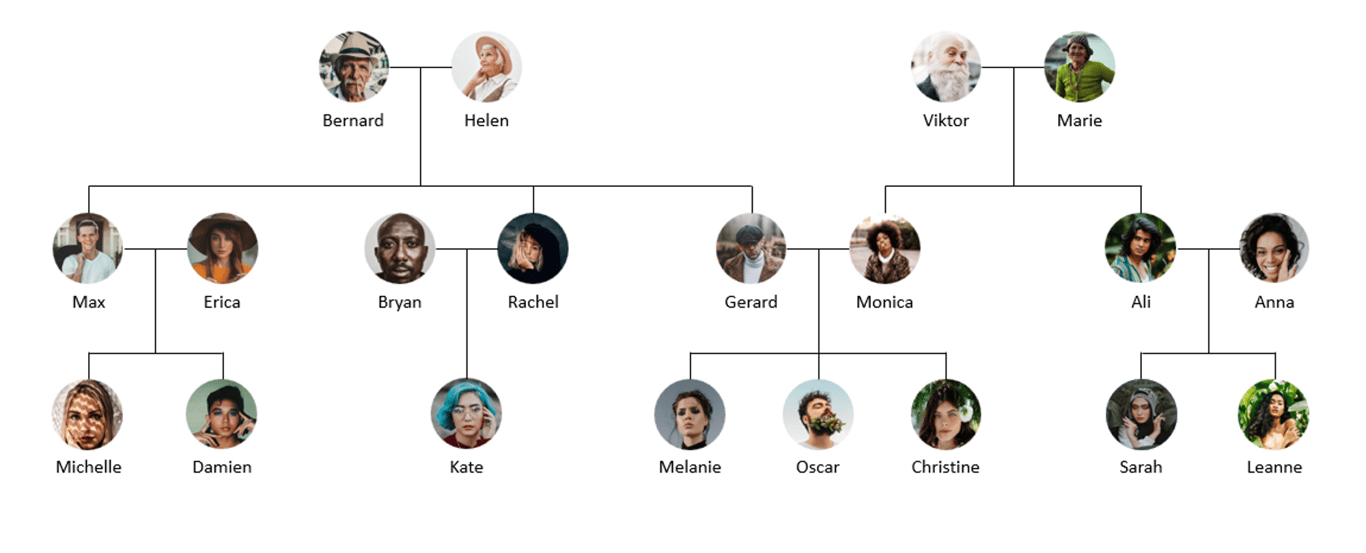
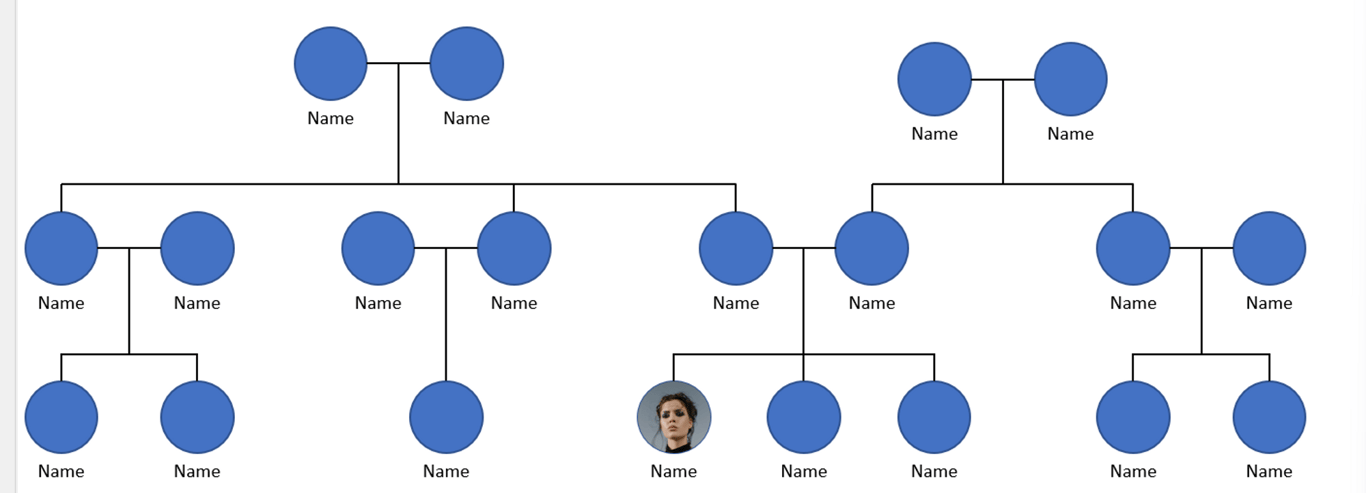
Then it’s just rinse and repeat for all the other people and you’re done! You should have a pretty nice looking family tree like below. Disclaimer, this is a completely fictional tree. It’s from the perspective of Melanie, Oscar and Christine, which is why only their parents have both of their families shown.
A better way to make a family tree
Hopefully this tutorial has helped you to make a beautiful family tree in PowerPoint. The example I made is a simple one, using simple relationships. I realise that most families will not be like this, but the steps and tips here should be enough to get you on the path to building and customising your own tree.
You are probably also wondering whether there’s a better way to make a tree like this, and the answer is yes. If you wanted to make changes or updates to your PowerPoint tree, it could end up being a pretty time consuming activity to shift things around, especially if you already used up the whole page.
That’s why you’re better off using a dedicated family tree maker like Kintree. We’ve done all of the tree organising for you on an infinite canvas, so that you can make a large tree with a few clicks, and upload photos and edit details seamlessly. Not to mention, it’s completely free.
Click here to read more about how it works, and create an account to start making your family tree.
As you make your family tree, you’ll quickly realise that making more than two or three generations can lead to problem. Learn exactly why it’s not always possible to make the family tree you want and what to do about it.
Google Docs can be a useful tool for building simple family trees that look great. This guide takes you through the steps required to take advantage of these tools.


 Made with Bullet